If the system administrator deliberately filters out all traffic except
port 22 (ssh), to a single server, it is very likely that you can still
gain access other computers behind the firewall. This article shows how
remote Linux and Windows users can gain access to firewalled samba, mail,
and http servers. In essence, it shows how openSSH and PuTTY can be used
as a VPN solution for your home or workplace, without monkeying with
the firewall. This article is NOT suggesting you close port 22. These
step are only possible given valid accounts on all servers. But, read on, you
may be surprised what you can do, without punching additional holes through
the firewall -- punching additional holes is a bad idea.
From the Linux laptop 192.168.1.106, it is possible to get access
to the resources behind the firewall directly, including SAMBA
server, HTTP Server, and Mail Server which are blocked from the
outside by the firewall. The firewall only permits access to
the SSH Server via port 22; yet, as you will see, it is possible
to get access to the other servers.

The SSH Server is seen as 66.35.250.203 from the outside. To tunnel
traffic through the SSH Server, from the Linux laptop 192.168.1.106, create
the following "~/.ssh/config" file, on the Linux laptop.
~/.ssh/config
## Linux Laptop .ssh/config ##
Host work
HostName 66.35.250.203
        User sporkey
        LocalForward 20000 192.168.0.66:80
        LocalForward 22000 192.168.0.66:22
        LocalForward 22139 192.168.0.8:139
        LocalForward 22110 192.168.0.5:110

Host http
HostName localhost
        User donkey
        Port 22000
        HostKeyAlias localhosthttp
This file must have the following rights.
$ chmod 600 ~/.ssh/config
Take a look again at the file above. Note the entry
for "LocalForward 22000 192.168.0.66:22", and compare this
to the network diagram. The connection to the SSH Server
is made by running the command below, from the Linux laptop (192.168.1.106).
$ ssh -l sporkey 66.35.250.203
Quick hint: the above command can be shortened, since the user name "sporkey"
and the "HostName" are already specified in the config file. Therefore, you
can use "ssh work" as shown below.
$ ssh work
After this connection is made, it is possible to access the
HTTP Server directly, assuming the account donkey has access to
this server. The following command below is executed on the
Linux laptop (192.168.1.106). Yes, that is on the Linux laptop in
a new window. Again, this will be executed from 192.168.1.106 in a
new session. So note here the Linux laptop is getting direct access to
(192.168.0.66). Reference the diagram above. This is the "localhost" of
the Linux laptop -- you got this, right? The ssh sessions are initiated
from the Linux laptop.
$ ssh -l donkey localhost -p 22000
Since the config file maps "http" to localhost port 2200, the above command
can be shortened to the following:
$ ssh http
Wait, there is a better way. Instead of creating two terminal sessions, one
for "ssh work", then, another one for "ssh http", why not put it all together
in one command.
$ ssh -N -f -q work;ssh http
The above command will establish the connection to work, forwarding the necessary
ports to the other servers. The "-N" is for "Do not execute remote command", the
"-f" requests ssh to go to the background, and "-q" is to suppress all warnings
and diagnostic messages. So, still not short enough for you? Then create an
alias, alias http='ssh -N -f -q work;ssh http' and put that in your "~.bashrc"
file, which is about as short as you can get, since typing http on the
command line would get you to the HTTP server.
To copy files to this server, the command below is used. Note
uppercase "-P" follows "scp". If you are in the ".ssh" directory you will see
an "authorized_keys2" and maybe an "authorized_keys",
which you may want to append to the like files on the destination server. These
files are only listed as an example. Any file could be copied; but, if you copy
these files to the remote server and append the contents to the remote server's
authorized_key* files, then, you will not be prompted for a password the next time
you make a connection. See Tip 12 in
Linux Tips.
You will need to create an authorized_keys2 and authorized_keys file with all the public
keys of the computers that will connect. Below, assume you have these keys in the
currently directory on the laptop, and you want to copy this to the HTTP Sever [192.168.0.66].
The keys go in "~/.ssh/authorized_keys2" for ssh2. Again, take a look at
Linux Tips
. You
do not want to write over any existing keys.
$ scp -P 22000 authorized_keys* donkey@localhost:./.ssh/.
But, because you have everything in the "config" file, you can shorten the above
command to the following:
$ scp authorized_keys* http:./.ssh/.
The following command, executed from the Linux laptop, will download
the web page from the remote server (192.168.0.66).
$ wget http://localhost:20000/
Linux Laptop becomes Company Web Server -- Power of RemoteForward
Suppose the Linux laptop is running a web server. Is it possible for the
people in the company to view this, the web server on the laptop (192.168.1.106), when
they attach to HTTP Server (192.168.0.66)? Absolutely. Think about this because what
is being suggested here is that a laptop, with no direct access to the HTTP server, is
actually going to take over the company web server. Yes, that is exactly what will be shown
here; although, instead of taking over the company web server, which is running on port 80 of
(192.168.0.66), you will see how to add an additional web server on port 20080. However, if
you are intent upon taking over the company web server, you would have to perform similar steps
as root, since only root has the ability to take over the privileged ports. But, start with
this example first, then, you'll see how to do this on port 80. To perform this magic,
the "/etc/ssh/sshd_config", on the company web server (192.168.0.66), must have the
variable "GatewayPorts" set to "yes", otherwise, only the users logged into HTTP Server will
be able to see the laptop's web page. Instead, we want everyone in the company to have direct
access to the added port.
GatewayPorts yes
After making the change, you will need to restart sshd.
$ /etc/init.d/sshd restart
In the Linux laptop's "~/.ssh/config" add the following entry
RemoteForward 20080 localhost:80 so that
the complete "~/.ssh/config" is shown below.
## Updated Linux Laptop .ssh/config  ##
Host work
HostName 66.35.250.203
        User sporkey
        LocalForward 20000 192.168.0.66:80
        LocalForward 22000 192.168.0.66:22
        LocalForward 22139 192.168.0.8:139
        LocalForward 22110 192.168.0.5:110

Host http
HostName localhost
        User donkey
        Port 22000
        RemoteForward 20080 localhost:80
        HostKeyAlias localhosthttp
If you perform a "netstat -l" from 192.168.0.66, the remote company
web server, you should see the following:
tcp 0 0 *:20080 *:* LISTEN
This means that anyone, in the company, can view this webpage http://192.168.0.66:20080/ on
port 20080. If you wanted port 80, the default http port, the connected
user would have to have root privileges.
If you did not change the "/etc/ssh/sshd_config" file, "GatewayPorts" defaults
to "no". And executing a "netstat -l" (that's an ell), would return the following:
tcp 0 0 ::1:20080 *:* LISTEN
With the above restrictions, only users on the computer 192.168.0.66 would see the webpage on
192.168.1.106 from port 20080. This is what happens by default, since "GatewayPorts" is set to no.
By the way, did you figure out what the HostKeyAlias command does? If you make multiple
localhost entries in your config file without HostKeyAlias, .ssh/known_hosts will contain
multiple entries for "localhost" with different keys. Try it without HostKeyAlias and it
should bark at you.
For references on generating ssh key pairs, securing an ssh server from
remote root access, and samba mounts through an ssh tunnel see (TIP 12, TIP 13,
and TIP 138) in
Linux Tips
listed at the end of this article. In addition,if you are a system administrator, may want to take note of
(TIP 14), keeping yearly logs, and (TIP 26), which shows how to kill a user
and all their running processes. In addition, the following (TIP 10, TIP 11, TIP 15, TIP 24,
TIP 47, TIP 52, TIP 89, TIP 104, TIP 148, and TIP 150) may help with system security.
Step 1: (Download PuTTY)
Download putty.exe and
plink.exe. Although
plink.exe is not needed, it provides some handy features you may end up using later.
I normally put the files in "c:/bin", then, add this directory to the path.
Step 2: (Load the IP Address of Your Server)
Substitute the IP address 66.35.250.203 for the IP address of your ssh server
and save it. Note 66.35.250.203 really is sourceforge, so unless you're access
projects on sourceforge, you probably want a different IP address.

Step 3: (Create the Necessary Tunnels)
There are 2 additional servers you need access to. The "HTTP server" 192.168.0.66,
and "Mail server" 192.168.0.5. Click on Tunnel and fill in the following values.
The HTTP server works on port 80, so enter 80 in the Source port. The destination
is 192.168.0.60:80. Hit "Add" to commit this entry.
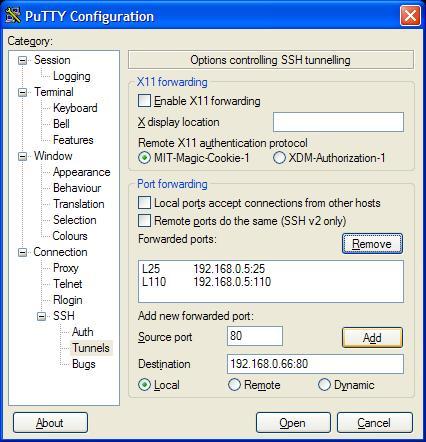
Your listing should be similar to the following. Make sure each entry has an
"L" listed in front of it. Local port 25 will now go to server 192.168.0.5
on port 25. But, ports 110 and 25 will go to server 192.168.0.5.

Step 4: (Testing the Connection)
If you now open your ssh connection, click on "Sourceforge", or whatever you
name it, then, you can browse the data on the "HTTP Server" by filling
in local host at the browser. It makes sense to "Check" the connection at
this stage -- remember to put in the correct IP addresses for your server.

Step 5: (Setting up Mail)
Mozilla Thunderbird is an excellent mail package. It will work in place
of Microsoft Outlook, when connect to your work's Exchange, Postfix, or Sendmail server.
The server location is localhost. And notice the option below to "Leave messages on server". If you have another email client
on your workstation at work, then, you might want to keep the mail on the server.

Step 6: (Getting Access to Samba Shares -- Loopback Adapter)
From the Windows XP computer, you want to add a Micosoft loopback Adapter. From the
control panel, follow the steps below. By the way, it is possible to add more than
one adapter.
  1.  Yes, I already connected the hardware
  2.  Add a new hardware device (bottom of menu)
  3.  Install the hardware that I manually select from a list (Advanced)
  4.  Select Network Adapters
  5.  Micosoft Loopback Adapter

Once the adapter is added, you must assign an IP address. The first adapter will
be assigned 10.0.0.1, the second will be assigned 10.0.0.2, etc. DO NOT enter a "Default gateway".

The second adapter will have the IP address 10.0.0.2. Remember, there are two
samba servers in the network diagram. Both the HTTP server and the SAMBA server
have samba shares. Again, DO NOT enter a "Default gateway".

The loopback Adapters should appear in the control panel

Step 7: (Getting Access to Samba Shares -- SSH Configuration Settings)
Now you want to go back into the Putty configuration. In the "Source port"
text box, yes it is small, enter 10.0.0.1:139; but note, the image below
only shows 0.0.1:139 because it has scrolled to the left. Also, enter 192.168.0.66:139
for the destination address. When done, click "Add".

The completed entry should look like the following:

You can repeat the same procedure above for more samba shares, if you want. Although not
shown, the same procedure is used for 10.0.0.2:139; but, it will have a destination
of 192.168.0.8. Again, there are two samba shares in the network diagram.
Step 8: (Getting Access to Samba Shares -- View It)
To view the samba share, click Start/Run and type in \\10.0.0.1\

Linux System Admin Tips
There are over 200 Linux tips and tricks in this article. That is over 150 pages covering topics from setting
and keeping the correct time on your computer, permanently deleting documents with shred, making
files "immutable" so that root cannot change or delete, setting up more than one IP address on a
single NIC, monitering users and processes, setting log rotate to monthly with 12 months of backups
in compressed format, creating passwords for Apache using the htpasswd command, common Perl commands,
using cfengine, adding users to groups, finding out which commands are aliased, query program text segment
size and data segment size, trusted X11 forwarding, getting information on the hard drive including the
current temperature, using Gnuplot, POVRAY and making animated GIFs, monitoring selective traffic with
tcpdump and netstat, multiple examples using the find command, getting the most from Bash, plus a lot more.
You can also down this article as a text document here
for easy grepping.
Linux Quota Tutorial
This tutorial walks you through implementing disk quotas for both users
and groups on Linux, using a virtual filesystem, which is a filesystem created from a disk file. Since quotas
work on a per-filesystem basis, this is a way to implement quotas on a sub-section, or even multiple subsections
of your drive, without reformatting. This tutorial also covers quotactl, or quota's C interface, by way of an example
program that can store disk usage in a SQLite database for monitoring data usage over time.
Google Gmail on Home Linux Box using Postfix and Fetchmail
If you have a Google Gmail account, you can relay mail from your home linux system. It's a good exercise in
configuring Postfix with TLS and SASL. Plus, you will learn how to bring down the mail safely, using
fetchmail with the "sslcertck" option, that is, after you have verify and copied the
necessary certificates. You'll learn it all from this tutorial. And you'll have Gmail running on your local Postfix MTA.
Create your own custom Live Linux CD
These steps will show you how to create a functioning Linux system,
with the latest 2.6 kernel compiled from source, and how to integrate
the BusyBox utilities including the installation of DHCP. Plus, how
to compile in the OpenSSH package on this CD based system.
On system boot-up a filesystem will be created and the
contents from the CD will be uncompressed and
completely loaded into RAM -- the CD could be removed
at this point for boot-up on a second computer. The remaining
functioning system will have full ssh capabilities.
You can take over any PC assuming, of course, you have
configured the kernel with the appropriate drivers and the
PC can boot from a CD.
MySQL Tips and Tricks
Find out who is doing what in MySQL and how to kill the process,
create binary log files, connect, create and select with Perl and Java,
remove duplicates in a table with the index command, rollback and how to apply,
merging several tables into one, updating foreign keys, monitor port 3306 with the tcpdump command,
creating a C API, XML and HTML output, spatial extensions, complex selects, and much more.
SQLite Tutorial
This article explores the power and simplicity of sqlite3,
first by starting with common commands and triggers, then the attach statement with the union operation is introduced in a way that allows multiple tables, in separate databases, to be combined as one virtual table, without the overhead of copying or moving data. Next, the simple sign function and the amazingly powerful trick of using this function in SQL select statements to solve complex queries with a single pass through the data is demonstrated, after making a brief mathematical case for how the sign function defines the absolute value and IF conditions.
Lemon Parser Tutorial
Lemon is a compact, thread safe, well-tested parser generator written by D. Richard Hipp. Using a parser generator, along with a scanner like flex, can be advantageous because there is less code to write. You just write the grammar for the parser. This article is an introduction to the Lemon Parser, complete with examples.
Special thanks to the following people who pointed out needed corrections.
